此篇文章為使用MyEclipse6.6GA自學Struts2整合Spring2.0、Hibernate3.2之環境建立方法,希望對入門的初學者有所幫助。
開發之環境如下:
1.Web Application:Tomcat 6.0.20(假設已先安裝OK)
2.MVC:Struts2.1.8
3.Spring2.0
4.ORM:Hibernate3.2
5.Database:MySQL 5.1.36(假設已先安裝OK)
6.IDE:MyEclipse6.6GA(假設已先安裝OK)
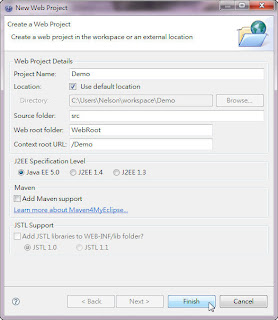
一、建立Web Application Project,如下圖所示:

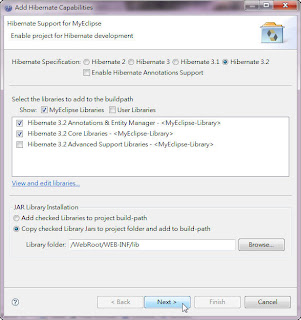
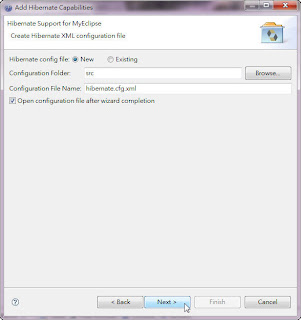
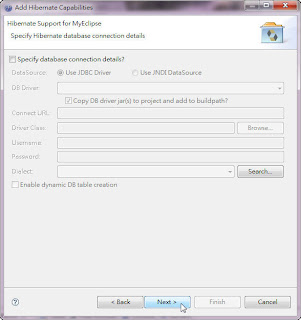
二、加入Hibernate Capabilites,如下圖所示:
1.選擇MyEclipse-->Project Capabilities-->Add Hibernate Capabilities選單
2.選擇Copy checked Libray jars to project folder and add to build path radio button
3.按下Next button
4.將Specify database connection detail? checkbox取消(因為不使用Hibernate來設定Database Connection,將在Spring設定)後按下Next button
5.將Create SessionFactory class? checkbox取消(因為不使用Hibernate來設定SessionFactory,將在Spring設定)
6.將xerces-2.6.2.jar及xml-apis.jar兩個jar file刪除,檔案放在WEB-INF\lib目錄下
完成Hibernate Add on

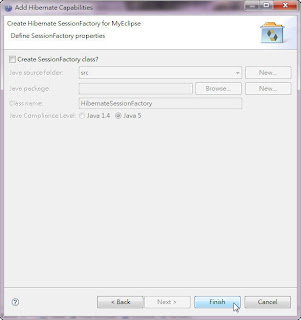
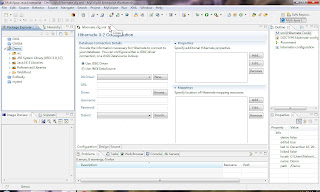
三、加入Spring Capabilites,如下圖所示:
1.選擇MyEclipse-->Project Capabilities-->Add Hibernate Capabilities選單
2.設定Spring version:
2.1.選擇Spring2.0 radio button
2.2.勾選Spring2.0 AOP Libraries、Spring2.0 Core Libraries、Spring2.0 Persistence Core Libraries、Spring2.0 Persistence JDBC Libraries、Spring2.0 Web Libraries等五個checkbox
2.3.選擇Copy checked Library contents to project folder(TLDs always copied)
2.4.按下Next button
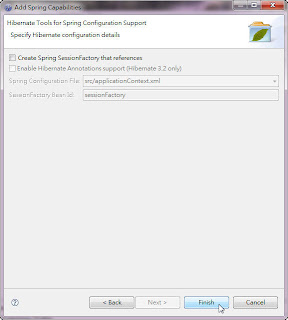
3.將Enable AOP builder checkbox取消後,按下Next button
4.將Create Spring SessionFactory that reference checkbox取消後,按下Finish button
5.將asm-2.2.3.jar檔案刪除,檔案放在WEB-INF\lib目錄下
完成Spring Add on

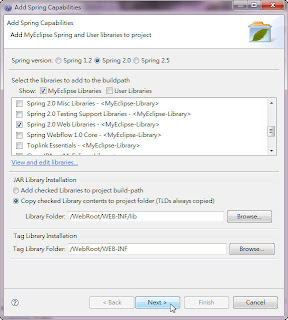
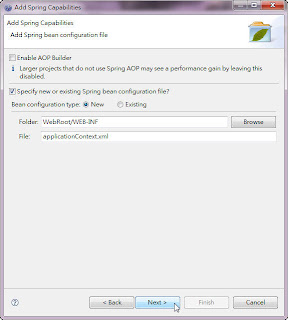
四、加入Struts2 Capabilites,如下圖所示:
1.由於MyEclipse6.6GA尚未將Struts2整合到其IDE,故需手動將Struts2之相關jar檔放在WEB-INF\lib目錄下,jar file如下:
1.1.freemarker-2.3.15.jar
1.2.ognl-2.7.3.jar
1.3.struts2-core-2.1.8.jar
1.4.xwork-core-2.1.6.jar
1.5.struts2-spring-plugin-2.1.8
2.refresh project或close project再open project看jar是否出現在Referenced Libraries下

五、Web與Struts2整合之設定,如下圖所示:
1.於WEB-INF\web.xml加入下列:
<filter>

<filter-name>struts2</filter-name>

<filter-class>org.apache.struts2.dispatcher.ng.filter.StrutsPrepareAndExecuteFilter</filter-class>

</filter>

<filter-mapping>

<filter-name>struts2</filter-name>

<url-pattern>/*</url-pattern>

</filter-mapping>
六、Web與Spring整合之設定,如下圖所示:
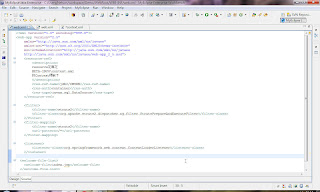
1.於WEB-INF\web.xml加入下列:
<listener>

<listener-class>org.springframework.web.context.ContextLoaderListener</listener-class>

</listener>
七、設定Web Resource for JNDI,如下圖所示:
1.於web.xml加入下列:
<resource-ref>

<description>resource定義在META-INF\context.xml的Context標籤下
</description>

<res-ref-name>jdbc/CMSDB</res-ref-name>

<res-auth>container</res-auth>

<res-type>javax.sql.DataSource</res-type>

</resource-ref>
八、設定Web Resource for JNDI,如下所示:
1.於META-INF下新增context.xml檔案
2.於context.xml加入下列:
<?xml version='1.0' encoding='utf-8'?>

<!--

  Licensed to the Apache Software Foundation (ASF) under one or more

  contributor license agreements.  See the NOTICE file distributed with

  this work for additional information regarding copyright ownership.

  The ASF licenses this file to You under the Apache License, Version 2.0

  (the "License"); you may not use this file except in compliance with

  the License.  You may obtain a copy of the License at


      http://www.apache.org/licenses/LICENSE-2.0


  Unless required by applicable law or agreed to in writing, software

  distributed under the License is distributed on an "AS IS" BASIS,

  WITHOUT WARRANTIES OR CONDITIONS OF ANY KIND, either express or implied.

  See the License for the specific language governing permissions and

  limitations under the License.

-->

<!-- The contents of this file will be loaded for each web application -->


<Context path="/CMSM" docBase="C:\Users\Nelson\workspace\Demo\WebRoot"

        debug="5" reloadable="true" crossContext="true">


    <!-- Default set of monitored resources -->

    <WatchedResource>WEB-INF/web.xml</WatchedResource>


    <!-- maxActive: Maximum number of dB connections in pool. Make sure you

         configure your mysqld max_connections large enough to handle

         all of your db connections. Set to -1 for no limit.

         -->


    <!-- maxIdle: Maximum number of idle dB connections to retain in pool.

         Set to -1 for no limit.  See also the DBCP documentation on this

         and the minEvictableIdleTimeMillis configuration parameter.

         -->


    <!-- maxWait: Maximum time to wait for a dB connection to become available

         in ms, in this example 10 seconds. An Exception is thrown if

         this timeout is exceeded.  Set to -1 to wait indefinitely.

         -->


    <!-- username and password: MySQL dB username and password for dB connections  -->


    <!-- driverClassName: Class name for the old mm.mysql JDBC driver is

         org.gjt.mm.mysql.Driver - we recommend using Connector/J though.

         Class name for the official MySQL Connector/J driver is com.mysql.jdbc.Driver.

         -->


    <!-- url: The JDBC connection url for connecting to your MySQL dB.

         The autoReconnect=true argument to the url makes sure that the

         mm.mysql JDBC Driver will automatically reconnect if mysqld closed the

         connection.  mysqld by default closes idle connections after 8 hours.

         -->


  <Resource name="jdbc/CMSDB" auth="Container" type="javax.sql.DataSource"

               maxActive="4" maxIdle="30" maxWait="50"

               username="cmsadmin" password="admincms" driverClassName="com.mysql.jdbc.Driver"

               url="jdbc:mysql://localhost:3306/cmsdb?autoReconnect=true"/>


</Context>
九、WEB-INF\applicatoinContext.xml中設定JNDI當datasource及SessionFactory,如下圖所示:
1.JNDI:
 <!-- 使用jndi當dataSource  -->

 <bean id="dataSource" class="org.springframework.jndi.JndiObjectFactoryBean">

  <!-- 當resourceRef=false,則jndiName需加上java:comp/env字元,resourceRef其default value=false

  <property name="resourceRef">false</property>

  <property name="jndiName" value="java:comp/env/jdbc/MytestDB"></property>

   -->

  <property name="resourceRef" value="true"></property>

  <property name="jndiName" value="jdbc/CMSDB"></property>

  <property name="proxyInterface" value="javax.sql.DataSource"></property>

 </bean>
2.SessionFactory:
 <bean id="sessionFactory" class="org.springframework.orm.hibernate3.LocalSessionFactoryBean">

  <property name="dataSource" ref="dataSource"></property>

  <property name="hibernateProperties">

   <props>

    <prop key="hibernate.show_sql">true</prop>

    <prop key="hibernate.dialect">org.hibernate.dialect.MySQL5Dialect</prop>

   </props>

  </property>

  <property name="mappingResources">

   <list>


   </list>

  </property>

 </bean>

p.s.:dbcp當datasource之設定方法
 <!-- 直接使用dbcp當dataSource

 <bean id="dataSource" class="org.apache.commons.dbcp.BasicDataSource" destroy-method="close">

  <property name="driverClassName" value="com.mysql.jdbc.Driver"></property>

  <property name="url" value="jdbc:mysql://localhost:3306/mytest"></property>

  <property name="username" value="manning"></property>

  <property name="password" value="action"></property>

  <property name="maxActive" value="50"></property>

  <property name="maxIdle" value="50"></property>

  <property name="maxWait" value="100"></property>

  <property name="defaultAutoCommit" value="true"></property>

 </bean>

  -->

p.s.:weblogic使用JNDI之設定方法:
 <!-- spring use jdni with weblogic config

 <bean id="jndiDataSource" class="org.springframework.jndi.JndiObjectFactoryBean">

  <property name="resourceRef" value="true"></property>

  <property name="jndiName" value="MySqlDataSource"></property>

  <property name="jndiEnvironment">

   <props>

    <prop key="java.naming.provider.url">t3://localhost:7001</prop>

   </props>

  </property>

 </bean>

 -->
十、DAO for login建立,如下所示:
1.建立User bean(User.java):
package com.bean.user;


public class User {

 private String account;

 private String password;

 private String firstname;

 private String lastname;

 private String email;


 public String getAccount() {

  return account;

 }

 public void setAccount(String account) {

  this.account = account;

 }

 public String getPassword() {

  return password;

 }

 public void setPassword(String password) {

  this.password = password;

 }

 public String getFirstname() {

  return firstname;

 }

 public void setFirstname(String firstname) {

  this.firstname = firstname;

 }

 public String getLastname() {

  return lastname;

 }

 public void setLastname(String lastname) {

  this.lastname = lastname;

 }

 public String getEmail() {

  return email;

 }

 public void setEmail(String email) {

  this.email = email;

 }

}


2.建立Login DAO(LoginDAO.java):
package com.dao.user;


import com.bean.user.User;


public interface LoginDAO {

 public User findByAccount();

}
3.建立LoginDAO Implement(LoginDAOImp.java):
package com.dao.impl.user;


import java.util.List;


import org.apache.commons.lang.StringUtils;

import org.apache.commons.logging.Log;

import org.apache.commons.logging.LogFactory;

import org.hibernate.Query;

import org.hibernate.Session;

import org.hibernate.transform.Transformers;

import org.springframework.orm.hibernate3.support.HibernateDaoSupport;


import com.bean.user.User;

import com.dao.user.LoginDAO;


public class LoginDAOImpl extends HibernateDaoSupport implements LoginDAO {

 private static final Log log = LogFactory.getLog(LoginDAOImpl.class);


 @SuppressWarnings("unchecked")

 public User findByProperty(String[] columnNames, String[] values) {

  User user = null;

  log.debug("finding by Names of tbl_user with native sql");

  Session session = this.getSession();

  try {

      String queryString = "select model.account,model.password,model.firstname,model.lastname,model.email from cmsdb.tbl_user model where";

      for(int i=0;i<columnNames.length;i++){

       queryString+=" model."+columnNames[i]+"=? and";

      }

   queryString=StringUtils.removeEnd(queryString, "and");

   Query queryObject = session.createSQLQuery(queryString);

      for (int i = 0; i < values.length; i++) {

          queryObject.setParameter(i, values[i]);

      }

      List<User> list = queryObject.setResultTransformer(Transformers.aliasToBean(User.class)).list();

      if(list.size()>0){

       user = (User)list.get(0);

      }

      log.debug("find by property Names successful");

      return user;

  } catch (RuntimeException re) {

      log.error("find by property Names failed", re);

          throw re;

  }finally{

      session.close();

  }

 }


}
4.於WEB-INF\applicationContext.xml加入DAO設定:
<!-- DAO -->

<bean id="loginDAO" class="com.dao.impl.user.LoginDAOImpl">

<property name="sessionFactory" ref="sessionFactory"></property>

</bean>
十一、Service for login建立,如下所示:
1.建立Login Service(LoginService.java):
package com.service.user;


import com.bean.user.User;


public interface LoginService {

 public User findAccount(String[] columnNames, String[] values);

}
2.建立Login Service Implement(LoginServiceImpl.java):
package com.service.impl.user;


import com.bean.user.User;

import com.dao.user.LoginDAO;

import com.service.user.LoginService;


public class LoginServiceImpl implements LoginService {

 private LoginDAO loginDao;

 public User findAccount(String[] columnNames, String[] values) {

  return this.loginDao.findByProperty(columnNames, values);

 }

 public LoginDAO getLoginDao() {

  return loginDao;

 }

 public void setLoginDao(LoginDAO loginDao) {

  this.loginDao = loginDao;

 }

}
3.於WEB-INF\applicationContext.xml加入Service設定:
<!-- Service -->

<bean id="loginService" class="com.service.impl.user.LoginServiceImpl">

<property name="loginDao" ref="loginDAO"></property>

</bean>
十二、login及login Success頁面建立,如下所示:
1.login頁面(index.jsp):
<%@ page language="java" import="java.util.*" pageEncoding="UTF-8"%>
<%@ taglib prefix="s" uri="/struts-tags" %>
<%
String path = request.getContextPath();
String basePath = request.getScheme()+"://"+request.getServerName()+":"+request.getServerPort()+path+"/";
%>
<!DOCTYPE HTML PUBLIC "-//W3C//DTD HTML 4.01 Transitional//EN">
<html>
<head>
<base href="<%=basePath%>">
<title>My JSP 'index.jsp' login page</title>
<meta http-equiv="pragma" content="no-cache">
<meta http-equiv="cache-control" content="no-cache">
<meta http-equiv="expires" content="0">
<meta http-equiv="keywords" content="keyword1,keyword2,keyword3">
<meta http-equiv="description" content="This is my page">
<!--
<link rel="stylesheet" type="text/css" href="styles.css">
-->
</head>
<body>
<center>
登入頁面. <br>
<table>
<s:form name="loginForm" action="login" method="post">
<tr>
<s:textfield name="account" label="使用者"/>
</tr>
<tr>
<s:password name="password" label="密碼"/>
</tr>
<tr>
<td colspan="2" align="center">
<input type="submit" value="登入">
<input type="reset" value="重置">
</td>
</tr>
</s:form>
</table>
</center>
</body>
</html>
2.login Success頁面(success.jsp):
<%@ page language="java" import="java.util.*" pageEncoding="UTF-8"%>

<%@ taglib prefix="s" uri="/struts-tags" %>

<%

String path = request.getContextPath();

String basePath = request.getScheme()+"://"+request.getServerName()+":"+request.getServerPort()+path+"/";

%>


<!DOCTYPE HTML PUBLIC "-//W3C//DTD HTML 4.01 Transitional//EN">

<html>

  <head>

    <base href="<%=basePath%>">


    <title>My JSP 'success.jsp' starting page</title>


 <meta http-equiv="pragma" content="no-cache">

 <meta http-equiv="cache-control" content="no-cache">

 <meta http-equiv="expires" content="0">

 <meta http-equiv="keywords" content="keyword1,keyword2,keyword3">

 <meta http-equiv="description" content="This is my page">

 <!--

 <link rel="stylesheet" type="text/css" href="styles.css">

 -->


  </head>


  <body>

    登入成功. <br>

    使用者:<s:property value="account"/><br>

    密碼: <s:property value="password"/><br>

  </body>

</html>
十三、login Action建立,如下所示:
1.建立加密類別(Encryption.java):
package com.util;


import java.io.UnsupportedEncodingException;

import java.security.MessageDigest;

import java.security.NoSuchAlgorithmException;

import sun.misc.BASE64Encoder;


/**

* 此類別提供文字加密功能其加密之演算法可為MD5,SHA-1,SHA-256,SHA-384,SHA-512等.

* @author Nelson Chen

* @version 1.0

* <p>

* 文件建立日期:2009/10/20

* </p>

*/

public class Encryption {

  public Encryption(){


  }

  /**

   * 此method提供加密之功能.

   * @param strPlanText 欲加密的文字.

   * @param strAlgorithm 欲使用加密的演算法:MD5,SHA-1,SHA-256,SHA-384,SHA-512.

   * @param strEncoding 文字之編碼:UTF-8,UTF-16,

   * @return 回傳一串加密後的文字.

   */

  public String Encrypt(String strPlanText,String strAlgorithm,String strEncoding){

   String strEncrypt = null;

   MessageDigest md = null;

   try{

     if(strEncoding==null || strEncoding.equals("")){

      strEncoding = "UTF-8";

     }


     if(strAlgorithm==null || strAlgorithm.equals("")){

      strAlgorithm = "MD5";

     }


     byte[] bstr = strPlanText.getBytes(strEncoding);

     md = MessageDigest.getInstance(strAlgorithm);

     md.update(bstr);

     strEncrypt = (new BASE64Encoder()).encode(md.digest());

   }catch(UnsupportedEncodingException ue){

     ue.printStackTrace();

     System.out.println(ue.getMessage());

     return null;

   }catch(NoSuchAlgorithmException na){

     na.printStackTrace();

     System.out.println(na.getMessage());

     return null;

   }

   return strEncrypt;

  }


  /**

   * 驗證加密功能是否正確!!

   */

  public static void main(String[] args){

   String chartCode = "UTF-8";

   String chartCode1 = "UTF-16";

   String inputStr = "admincms";


   Encryption enc = new Encryption();


   System.out.println("input String:"+inputStr+",Encryption(SHA-1):"+enc.Encrypt(inputStr, "SHA-1",chartCode));

   System.out.println("input String:"+inputStr+",Encryption(SHA-256):"+enc.Encrypt(inputStr, "SHA-256",chartCode));

   System.out.println("input String:"+inputStr+",Encryption(SHA-384):"+enc.Encrypt(inputStr, "SHA-384",chartCode));

   System.out.println("input String:"+inputStr+",Encryption(MD5):"+enc.Encrypt(inputStr, "MD5",chartCode));

   System.out.println("input String:"+inputStr+",Encryption(MD5):"+enc.Encrypt(inputStr, "MD5",chartCode1));

  }

}
2.建立Login Action(LoginAction.java):
package com.action.user;


import com.opensymphony.xwork2.ActionSupport;

import com.service.user.LoginService;

import com.util.Encryption;

import com.bean.user.User;


public class LoginAction extends ActionSupport {

 /**

  *

  */

 private static final long serialVersionUID = -3492717103532316582L;

 private String account;

 private String password;

 private LoginService loginService;


 @Override

 public String execute() throws Exception {

  String[] columnNames;

  String[] values;

  User user;

  columnNames = new String[2];

  columnNames[0]="account";

  columnNames[1]="password";

  values = new String[2];

  values[0]=this.account;

  values[1]=this.password;

  user = this.loginService.findAccount(columnNames, values);

  if(user==null){

   columnNames = new String[1];

   columnNames[0]="account";

   values = new String[1];

   values[0]=this.account;

   user = this.loginService.findAccount(columnNames, values);

   if(user==null){

    this.addFieldError("account", "帳號不存在!");

    return INPUT;

   }

   columnNames = new String[1];

   values = new String[1];

   columnNames[0]="password";

   values[0]=this.password;

   user = this.loginService.findAccount(columnNames, values);

   if(user==null){

    this.addFieldError("password", "密碼錯誤!");

    return INPUT;

   }

  }

  return SUCCESS;

 }


 public String getAccount() {

  return account;

 }


 public void setAccount(String account) {

  this.account = account;

 }


 public String getPassword() {

  return password;

 }


 public void setPassword(String password) {

  Encryption enc = new Encryption();

  this.password = enc.Encrypt(password, "MD5", "UTF-8");

 }


 public LoginService getLoginService() {

  return loginService;

 }


 public void setLoginService(LoginService loginService) {

  this.loginService = loginService;

 }

}
3.於struts.xml(src目錄下)設定Struts2 Action:
<?xml version="1.0" encoding="UTF-8"?>

   <!DOCTYPE struts PUBLIC

 "-//Apache Software Foundation//DTD Struts Configuration 2.1//EN"

 "http://struts.apache.org/dtds/struts-2.1.dtd">


<struts>

 <constant name="struts.devMode" value="true"></constant>

 <constant name="struts.configuration.xml.reload" value="true"></constant>

 <constant name="struts.i18n.reload" value="true"></constant>

 <constant name="struts.custom.i18n.resources" value="globalMessages"></constant>


 <package name="Demo" extends="struts-default">

  <action name="login" class="loginAction">

   <result name="input">/index.jsp</result>

   <result name="success">/success.jsp</result>

  </action>

 </package>

</struts>
4.於applicationContext.xml(WEB-INF目錄下)設定Struts2 Action:
<!-- Action -->

<bean id="loginAction" class="com.action.user.LoginAction" scope="prototype">

<property name="loginService" ref="loginService"></property>

</bean>
十四、測試運行是否正確,如下圖所示:
1.http://localhost:8080/Demo
於測試時資料庫內需先有一個帳號資料ccdccs,否則將出現帳號不存在之畫面。


看到此畫面,恭喜您整合開發環境設定成功!
沒有留言:
張貼留言